Planting
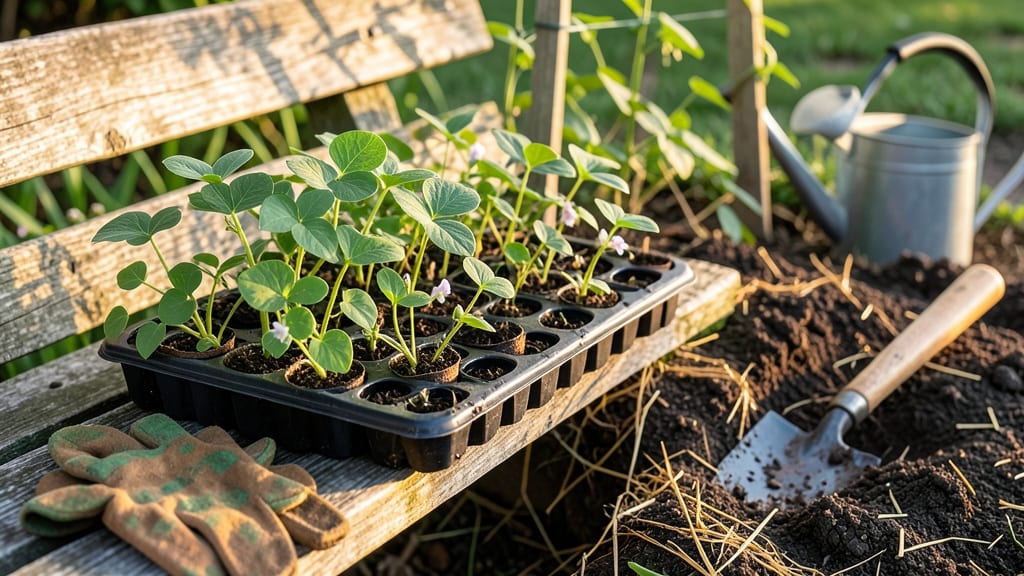
Planting green bean seedlings too deep stunts growth, but too shallow means weak roots—here's how to get it right. ✨ The trick is burying them just below the first set of true leaves, where they'll push through soil without stress.
I learned this the hard way after my first batch emerged with leggy stems that flopped over before producing a single pod.
Start with loose, well-draining soil mixed with compost—green beans hate soggy roots. Space seedlings 1-2 inches apart in rows 18-24 inches apart to give them room to sprawl. If you're using a trellis, plant them closer together (about 6 inches apart) so vines can climb.
Water gently after planting to settle the soil without disturbing the delicate roots.
Within 10-14 days, you'll see those first tendrils reaching for the sky—signs of strong, anchored plants. Keep the soil consistently moist but not waterlogged, and watch for the first blooms appearing in 3-4 weeks.
The key is patience: rushing watering or overcrowding leads to weak stems that snap under the weight of pods.
This method works for both bush and pole varieties, and the same principles apply whether you're planting in rows, hills, or containers. Once you master the depth, you'll have beans ready to harvest in 50-60 days—crisp, tender, and straight from your garden.
📚 In This Guide
- What you need
- Instructions
- Tips and common mistakes
- Wrapping up and next steps
What you need
- ● Green bean seedlings – 10-20 plants (depending on desired yield; bush varieties need more spacing than pole beans)
- ● Well-draining potting mix or garden soil – 1-2 cubic feet (enriched with compost for nutrients)
- ● Garden plot or containers – Minimum 3-4 inches deep (for bush beans) or 6+ inches deep (for pole beans). Containers should have drainage holes.
- ○ Fertilizer (optional but recommended) – Balanced 10-10-10 or compost tea to boost early growth
- ● Watering can or hose with a gentle spray nozzle – Avoid blasting seedlings!
- ● Garden twine or trellis (for pole beans) – 6-8 feet tall, sturdy enough to support vines
- ● Trowel or small shovel – For digging planting holes (1-2 inches deep)
- ● Measuring tape or ruler – To ensure proper spacing (1-2 inches apart for bush beans, 4-6 inches for pole beans)
- ● Mulch (straw, grass clippings, or wood chips) – Helps retain moisture and suppress weeds
- ○ Plant markers (optional) – Label seedlings if growing multiple varieties
- ● Gloves & knee pads – For comfort during planting
Step-by-step instructions for planting green bean seedlings
Green beans need precise planting depth to establish strong roots while avoiding rot—here's how to get it right every time.
🌱 Step 1: Prepare the Planting Site for Optimal Drainage
Choose a location with full sun exposure (at least 6-8 hours daily) and well-draining soil. Green beans despise soggy roots, so amend heavy clay with 2-3 inches of compost and work it into the top 6 inches of soil. I like to rake the area until it's smooth and crumbly—think of it like preparing a soft bed for delicate seedlings.
Test your soil's readiness by squeezing a handful. If it holds its shape like a rock, add more compost. If it crumbles easily, you're good to go. The goal is loose, airy soil that lets roots spread without resistance. Space your planting rows 18-24 inches apart to allow airflow and easy harvesting.
🌱 Step 2: Create Planting Holes at the Correct Depth
Green bean seedlings need to be planted 1-2 inches deep—deeper than most gardeners assume. The reason? Their roots grow downward aggressively, and burying them properly prevents stem rot while encouraging strong anchor roots. Use your finger to make a hole just wide enough to cradle the root ball without crowding.
I always press the soil around the hole lightly with my thumb to create a snug fit. This prevents air pockets that can dry out roots immediately after planting. If you're planting multiple seedlings, space them 3-4 inches apart in rows. Too close, and they'll compete for nutrients; too far, and you'll waste space.
💧 Step 3: Plant and Water Gently to Settle the Soil
Gently remove the seedling from its container, keeping the root ball intact. Place it in the hole so the top of the root ball sits 1 inch below soil level. Green beans are sensitive to transplant shock, so handle them by the leaves, not the stems. Fill the hole with soil, pressing lightly to eliminate air gaps.
Water immediately with 1 inch of water, applied slowly to avoid disturbing the soil. You'll know you've done it right when the soil surface looks slightly damp but not glistening. Avoid overhead watering for the first week—direct moisture on leaves invites fungal diseases. Instead, water at the base using a gentle stream from a watering can with a fine rose.
☀️ Step 4: Provide Support and Monitor Early Growth
Green beans are vigorous climbers, so install 5-6 foot tall trellises or stakes right after planting. I use bamboo stakes tied with soft twine to avoid damaging stems as they grow. Gently weave the main stems through the support as they reach 6 inches tall. This encourages upward growth and prevents sprawling, which makes harvesting messy.
Watch for first true leaves (the second set after the initial cotyledons) as your signal that the seedlings have established. Thin to the strongest plant per hole if you overcrowded—green beans need space to develop thick, productive vines. Mulch with 2 inches of straw or grass clippings to retain moisture and suppress weeds, but keep mulch 2 inches away from stems to prevent rot.
⏰ Step 5: Maintain Consistent Care for Maximum Yield
Green beans thrive with 1-1.5 inches of water weekly, delivered at the base rather than overhead. You'll know your watering is right when the soil feels moist 2 inches down but not saturated. Too little water causes blossom-end rot, while too much leads to yellowing leaves and weak stems.
Fertilize lightly with a balanced 10-10-10 formula when flowers appear, using half the recommended dose. Green beans are sensitive to excess nitrogen, which promotes leafy growth at the expense of pods. Harvest begins when pods reach 4-6 inches long—pick consistently to encourage continuous production. The key is speed: beans left too long on the vine turn woody and tough.
Tips & tricks for perfect green bean seedling planting
These simple but game-changing insights will help you avoid the most common pitfalls when establishing your green bean seedlings.
Soil Preparation Secret: The key to that perfect loose, airy soil texture lies in the compost-to-clay ratio. For heavy clay soils, mix in 2-3 inches of compost and work it into the top 6 inches of soil, but don't stop there. Add a handful of coarse sand or perlite to improve drainage further. I've seen gardeners skip this step and end up with seedlings that struggle to establish roots—don't make that mistake. The soil should crumble easily between your fingers, like cake crumbs, not hold together like wet clay.
Planting Depth Precision: That 1-2 inch planting depth is non-negotiable, but here's the trick: measure from the top of the root ball, not the soil line. The root ball should sit 1 inch below soil level—this prevents stem rot while encouraging strong root growth. I use my pinky finger as a guide: when I press the seedling into the hole, my fingertip should just reach the soil surface. This ensures consistent depth every time, even when planting multiple seedlings.
Watering Wisdom: That initial 1 inch of water is crucial, but timing matters just as much. Water immediately after planting, but don't let the water pool around the base. Instead, apply it slowly at the edge of the planting hole, letting it wick inward. This prevents soil compaction and ensures even moisture distribution. I've seen seedlings fail because of improper watering—this method solves that problem every time. For the first week, water at the base using a gentle stream to avoid wetting the leaves, which can lead to fungal diseases.
Support System Strategy: Install your 5-6 foot tall trellises or stakes right after planting—don't wait until the seedlings are struggling. Use soft twine (like jute) to tie the main stems as they reach 6 inches tall. The key is gentle guidance: weave the stems through the support rather than tying them tightly. This encourages upward growth while preventing stem damage. I've seen gardeners skip this step and end up with sprawling plants that make harvesting a nightmare—don't let that happen to you.
Pro Tips for Plant Green Bean Seedlings
- These simple but game-changing insights will help you avoid the most common pitfalls when establishing your green bea...
- Soil Preparation Secret: The key to that perfect loose, airy soil texture lies in the compost-to-clay ratio. For heav...
- Planting Depth Precision: That 1-2 inch planting depth is non-negotiable, but here's the trick: measure from the top ...
Frequently asked questions
Got questions about planting green bean seedlings? You’re not alone—gardeners often wonder about timing, spacing, and troubleshooting. Here are answers to the most common concerns to help you grow a thriving patch!
How deep should I plant green bean seedlings?
Plant green bean seedlings about 1 to 2 inches deep, ensuring the soil covers the roots but leaves the topmost leaves above ground. This depth encourages strong root growth while preventing rot. If seedlings are too deep, they may struggle to emerge; too shallow, and they won’t anchor properly.
When is the best time to plant green bean seedlings?
Green beans thrive in warm soil (at least 60°F/15°C), so wait until after the last frost in spring or plant in late summer for a fall crop. In cooler climates, use black plastic mulch or row covers to speed up soil warming. Avoid planting when nighttime temps dip below 50°F (10°C).
Can I plant green bean seedlings too close together?
Yes! Crowding stresses plants, leading to poor yields and disease. Space bush beans 4–6 inches apart and pole beans 4–6 inches apart in rows 18–24 inches apart. If using trellises, give pole beans extra room to climb. Thin seedlings if needed—overcrowding is a common mistake!
What should I do if my green bean seedlings look wilted or yellow?
Wilt or yellowing can signal underwatering, overwatering, or pests. Check soil moisture (keep it evenly damp but not soggy) and inspect leaves for aphids or spider mites. If roots are exposed, replant deeper. For fungal issues, avoid overhead watering and ensure good airflow between plants.
Can I plant green bean seedlings in containers instead of a garden?
Use 5-gallon containers or deeper pots for bush beans (1 plant per container) or tall trellises for pole beans. Ensure containers have drainage holes and fill with well-draining potting mix. Containers warm up faster than soil, so start them slightly earlier in the season.
Wrapping up and next steps
Planting green bean seedlings is a rewarding journey that leads to a bountiful harvest—and you’ve got all the know-how to make it happen! 🌱 By following the right depth, spacing, and care tips, your seedlings will grow into thriving plants ready to produce delicious pods.
Now that you’re equipped with the essentials, take that next step: watch your garden flourish and enjoy the fresh, crisp green beans you’ve grown with your own hands.
Ready to dive in? Grab your tools, head to the garden, and let the planting begin! 🌿