
Planting
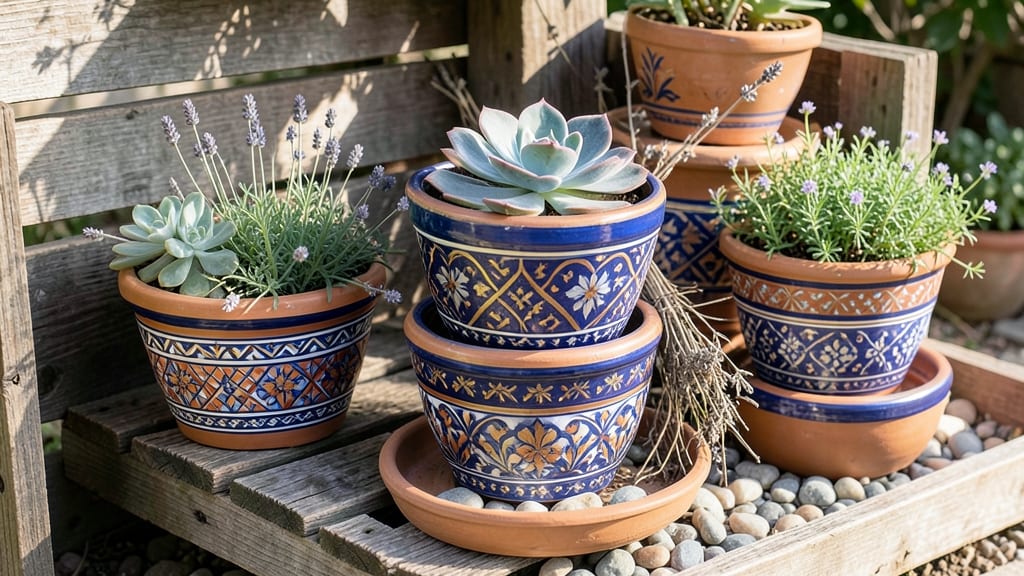
Spanish painted plant pots bring bold Mediterranean charm to any garden space. 🌿 I fell in love with their intricate patterns after transforming my patio—suddenly, even my most basic plants looked like they belonged in a Spanish courtyard.
The secret isn’t just the paint; it’s how these vibrant designs make every container feel intentional and full of character.
These pots work beautifully with drought-tolerant plants like lavender, rosemary, or succulents, where their bright colors contrast perfectly against silvery foliage. For a more lush look, pair them with trailing ferns or vibrant geraniums—suddenly, your patio or balcony feels like a curated display rather than just a collection of plants.
The patterns also hide soil edges, making even the simplest containers look polished.
Placement is key: group pots of similar patterns for a cohesive look, or mix sizes for visual interest. A single bold pot can anchor a seating area, while clusters create a lively border.
Maintenance is simple—just seal the paint annually to keep colors vibrant and prevent chipping, and your pots will stay looking fresh for years.
Whether you’re decorating a small balcony or a sprawling backyard, these painted pots elevate any space with minimal effort. The best part? You can customize them to match your garden’s color palette or create a theme that tells a story—like a mini Spanish village right in your own yard.
📚 In This Guide
- What you need
- Instructions
- Tips and common mistakes
- Wrapping up and next steps
What you need
- ● Terracotta or ceramic plant pots (1–3, depending on project size; 6–12" diameter works best for visibility)
- ● Acrylic paint (matte or satin finish for durability; 1–2 colors per pot, plus white for base coats if needed)
- ● Paintbrushes (varied sizes: 1 fine-tip for details, 1 medium for filling, 1 wide for backgrounds)
- ● Painter’s tape (low-tack, ½" width for crisp edges)
- ● Palettes or disposable plates (for mixing paints)
- ● Water & paper towels (for cleanups)
- ● Stencils (for geometric or floral patterns; Spanish-inspired motifs like azulejo tiles or damask work great!)
- ● Sealer spray (waterproof, UV-resistant for outdoor pots)
- ● Pencil & ruler (for sketching designs before painting)
- ● Sponge or cloth (for blending or textured effects)
- ● Diluted white paint (as a primer for vibrant colors)
- ● A well-ventilated workspace (outdoors or near an open window)
- ● Patience (let paint dry between layers—typically 1–2 hours per coat)
- ● Inspiration! (Sketch your design or browse Spanish pottery for ideas 🇪🇸)
Step-by-step instructions for creating Spanish painted plant pots
Turn plain terracotta into vibrant works of art with these simple steps—perfect for adding Mediterranean charm to your garden.
🎨 Step 1: Gather Supplies and Prep Your Pots
Start with 4 plain terracotta pots (any size) and clean them thoroughly with warm, soapy water to remove dust and grime. Let them dry completely before painting—any moisture will ruin your design. I like to use acrylic paint (it’s waterproof and holds up outdoors) in earthy tones like burnt orange, deep green, and cream, plus a few bright accents like cobalt blue or terracotta red.
Lay out your paints, a small foam brush (for details), a medium-sized brush (for base coats), clear outdoor sealant (to protect your work), and pencil and ruler for sketching designs. Sketch your pattern lightly with pencil first—think geometric shapes, stripes, or traditional Spanish lattice designs. The key is keeping it simple so the patterns remain crisp over time.
🎨 Step 2: Paint the Base Coat and Let Dry
Apply your first coat of paint to the entire pot, including the inside rim if you want a matching look. Use even strokes to avoid drips—thin layers dry faster and look cleaner. Let the paint dry completely (2-3 hours or as directed on the paint can). This step is critical: rushing leads to smudges, and smudges ruin the clean lines of Spanish patterns.
While drying, set up a newspaper-covered workspace to protect surfaces. Keep your brushes clean by rinsing them in water between colors—acrylic paint dries fast, and dried paint in brushes is a nightmare to remove. Pro tip: Use a small palette or disposable plate to mix paint colors if you’re blending shades.
🎨 Step 3: Add Patterns and Details
Once the base is dry, sketch your design with pencil again to guide you. For crisp lines, use a fine-tip brush or even a toothpick for ultra-thin details. Start with the boldest colors first—like deep greens or reds—then layer lighter shades on top. Traditional Spanish patterns often include latticework, stripes, or floral motifs, but don’t overcomplicate it. A few well-placed accents make a bigger impact than a crowded design.
Work in thin layers, letting each dry slightly before adding the next. If you make a mistake, let the paint dry completely and lightly sand the area with fine-grit sandpaper (220 grit) before repainting. This keeps your final look smooth and professional.
🛡️ Step 4: Seal and Protect Your Design
Once your pots are fully dry (24 hours is best), apply 2-3 coats of outdoor sealant using a soft brush or cloth. This protects your hard work from rain, sun, and wear. Let each coat dry completely before adding the next—usually 1-2 hours per coat. Sealant also adds a subtle sheen that makes colors pop, so don’t skip this step.
After sealing, let the pots cure for 48 hours before using them. This ensures the sealant fully hardens and binds to the paint. Place them in your garden, and watch as they instantly elevate any space with their handcrafted charm. Real talk: The first time I painted pots this way, I worried the colors would fade in weeks—but after a full summer, they’re still vibrant.
⏰ Step 5: Maintain and Refresh as Needed
To keep your painted pots looking fresh, clean them gently with a damp cloth and mild soap if they get dirty. Avoid harsh scrubbing—it can wear down the sealant over time. If colors start to fade after a season or two, touch up with a small brush and a dab of matching paint. Store pots indoors during harsh winters if you’re in a cold climate, but most sealants hold up well year-round in milder areas.
Here’s the thing—your pots don’t have to be perfect. Imperfections in brushstrokes or slightly uneven lines add character. The goal is to create pots that reflect your personal style while bringing the warmth of Spanish design to your garden. Once you’ve done a few, you’ll start seeing patterns everywhere—like the way a simple stripe can transform a basic pot into something stunning.
Tips & tricks for perfect Spanish painted plant pots
Between us, these little details make all the difference when transforming terracotta pots into Mediterranean masterpieces.
Prep Like a Pro: Before you even touch paint, give your terracotta pots a thorough cleaning with warm, soapy water and let them dry completely. I learned this the hard way after my first attempt—moisture trapped under paint causes peeling and uneven drying. For extra grip, lightly sand rough spots with 220-grit sandpaper before painting. This creates a smoother surface for your acrylic paint to adhere to beautifully.
Layering Secret: The 2-3 hour drying time between base coat and patterns is non-negotiable for crisp results. I've found that using a hairdryer on low heat can cut this time by about 30 minutes if you're impatient—but only do this after the first 30 minutes of natural drying. Too much heat too soon causes cracking in the paint layers. Work in a well-ventilated area during this drying process to prevent paint fumes from building up.
Pattern Perfection: For those traditional Spanish lattice designs in Step 3, I recommend using a ruler to create perfectly straight lines before painting. Draw your pencil guidelines with light pressure—press too hard and you'll tear the terracotta. When adding details, work from darkest to lightest colors. This prevents lighter shades from bleeding into darker areas as you layer. A toothpick makes an excellent tool for creating fine lattice lines when a brush is too thick.
Sealant Strategy: Don't skip the 48-hour curing period after sealing—this is when the magic happens. The sealant needs this time to fully bond with the paint and create that beautiful protective barrier. I've found that applying the sealant with a soft cloth rather than a brush gives a more even, professional finish. For extra durability, especially in rainy climates, consider adding an extra third coat of sealant to the bottoms of your pots where they'll touch wet soil.
Pro Tips for Spanish Painted Plant Pots
- Between us, these little details make all the difference when transforming terracotta pots into Mediterranean masterp...
- Prep Like a Pro: Before you even touch paint, give your terracotta pots a thorough cleaning with warm, soapy water an...
- Layering Secret: The 2-3 hour drying time between base coat and patterns is non-negotiable for crisp results. I've fo...
Frequently asked questions
Got questions about transforming your plant pots with stunning Spanish-inspired designs? Here are some common ones—and their answers—to help you get started!
What’s the best type of paint to use for Spanish-style patterns?
For a durable, vibrant finish, opt for acrylic paint (water-based) or latex paint (for outdoor pots). Both adhere well and resist fading. Avoid oil-based paints—they take longer to dry and emit strong fumes. Pro tip: Use masonry paint for terracotta or concrete pots to prevent chipping!
How long should I wait between paint layers?
Let each layer dry completely—usually 1–2 hours for indoor conditions. For outdoor pots, wait 24 hours before adding a second coat to prevent smudging. Test with your finger: if it feels dry to the touch, you’re good to go!
Can I paint over existing paint or stains on my pots?
Yes! Lightly sand the surface first to help the new paint adhere. For stubborn stains (like old dirt or glue), use mild soap and water or a vinegar solution. Skip harsh chemicals—they can weaken the pot’s material over time.
Will the paint hold up in direct sunlight or rain?
Seal your design with a waterproof outdoor sealant (like polyurethane) to protect against UV rays and moisture. Reapply the sealant every 1–2 years for long-lasting vibrancy. Skip the sealant for indoor pots unless you’re extra cautious!
What’s a quick alternative if I don’t want to paint?
Try decoupage with Spanish-inspired paper cutouts or use stencils for clean patterns. For a no-paint option, wrap pots in burlap or fabric tied with twine—rustic and on-trend!
Wrapping up and next steps
Transforming your garden with Spanish painted plant pots is all about creativity, patience, and a touch of Mediterranean flair! 🌿 Whether you’re drawn to bold stripes, intricate tiles, or rustic terracotta hues, these handcrafted pots bring warmth and charm to any outdoor space.
The best part? You can start small—grab a few pots, some paint, and let your imagination run wild.
Ready to take the next step? Gather your supplies, pick a design, and begin your DIY project today. Your garden (and future plant babies) will thank you! 🎨✨